Privacy & Permissions
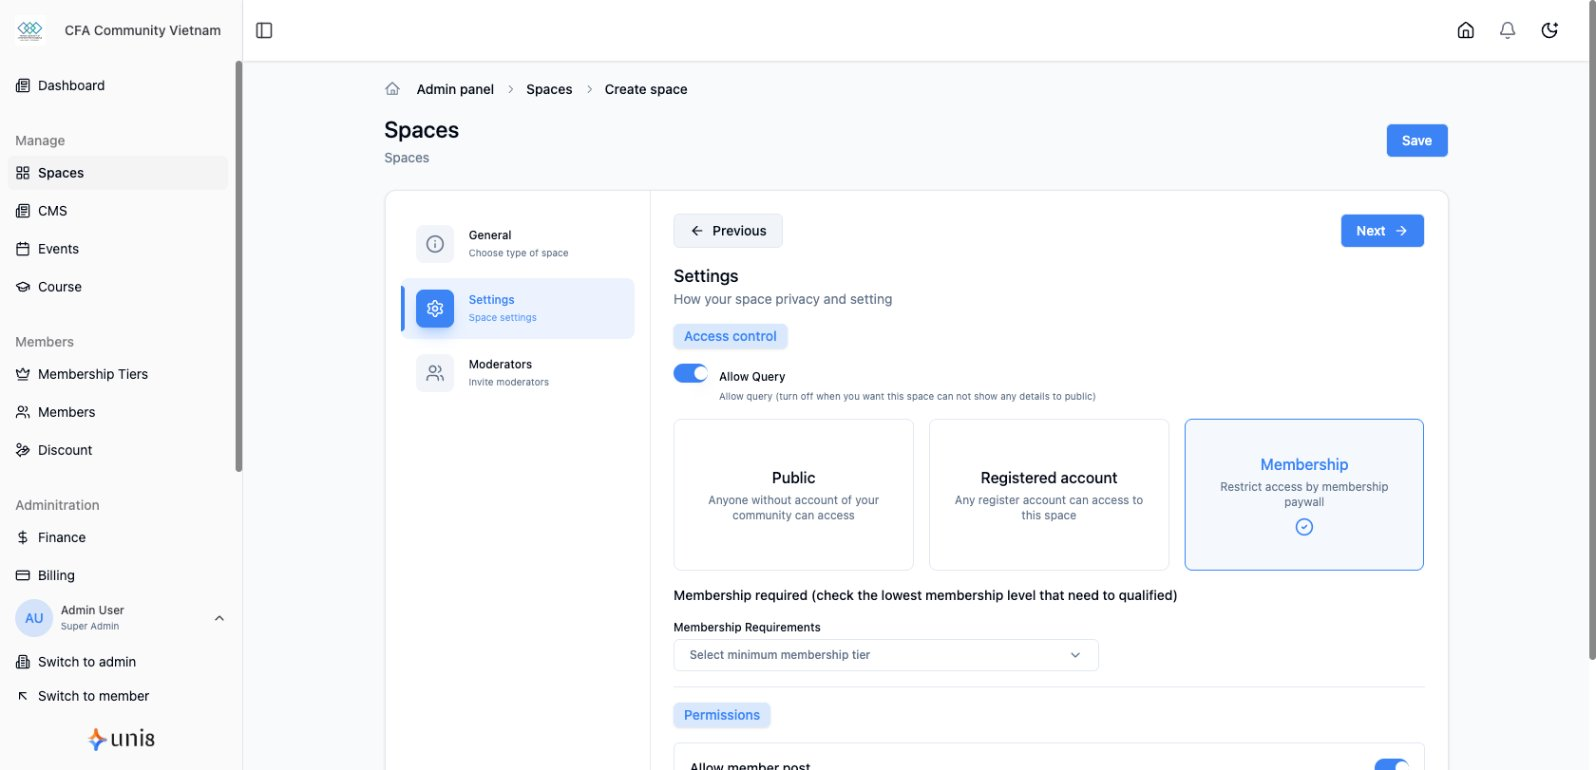
Control access to your spaces and define what members can do within them.
Space Privacy Levels
Public Spaces
Anyone can view content:
- Visible to all visitors
- Searchable by Google
- No login required to view
- Great for marketing content
Use for: Landing pages, public articles, marketing events
Members Only
Only registered members can access:
- Must be logged in
- All members have access
- Content not publicly searchable
- Good for general community content
Use for: Community discussions, member resources
Tier-Specific
Only specific membership tiers can access:
- Restricts to paid members
- Different tiers can have different access
- Premium content protection
- Upsell opportunity
Use for: Premium content, exclusive events, paid courses
Setting Space Privacy
On Creation
- Click + New Space
- In the privacy section, choose:
- Public
- Members Only
- Specific Tiers (select which)
- Complete creation
Changing Privacy
- Go to Spaces
- Click on the space
- Click Settings (gear icon)
- Go to Privacy tab
- Select new privacy level
- Click Save
Note: Changing to more restrictive won't remove existing members but will block new access.
Post-Level Privacy
Overriding Space Privacy
Individual posts can have different privacy:
- Public post in members-only space
- Premium post in public space
Setting Post Privacy
- Create or edit a post
- Find Visibility setting
- Choose access level
- Publish
Permissions Overview
What Can Be Controlled
| Permission | Description |
|---|---|
| View | See content in the space |
| Post | Create new posts |
| Comment | Comment on posts |
| React | Like/react to posts |
| Share | Share posts externally |
Permission Levels
| Level | Capabilities |
|---|---|
| Admin | Full control, all permissions |
| Moderator | Manage content, moderate discussions |
| Editor | Create and edit content |
| Member | View, comment, react (based on settings) |
| Visitor | View only (public spaces) |
Configuring Permissions
Space-Level Permissions
- Go to Spaces > [Space Name] > Settings
- Click Permissions tab
- Configure each permission:
| Setting | Options |
|---|---|
| Who can post | Everyone, Editors+, Moderators+, Admins |
| Who can comment | Everyone, Members, Editors+, None |
| Who can react | Everyone, Members, None |
- Click Save
Default Permissions by Space Type
| Space Type | Default Posting | Default Comments |
|---|---|---|
| News | Editors+ | Members |
| Events | Editors+ | Members |
| Courses | Admins | Disabled |
| Social | Members | Members |
| Jobs | Editors+ | Members |
| Directory | Admins | Disabled |
Role Management
Assigning Roles
- Go to Members
- Find the member
- Click Edit
- Select Role
- Save
Role Hierarchy
Admin
  └── Moderator
        └── Editor
              └── Member
                    └── Visitor
Higher roles inherit lower role permissions.
Membership Tier Access
Restricting by Tier
Create exclusive content for paying members:
- Set space privacy to "Specific Tiers"
- Select which tiers can access
- Members without tier see upgrade prompt
Multiple Tier Access
A space can be accessible to multiple tiers:
- Free tier sees basic spaces
- Premium tier sees basic + premium spaces
- VIP tier sees all spaces
Content Gating
What is Content Gating?
Showing previews but requiring access for full content:
- Teaser visible publicly
- Full content behind login/paywall
- Encourages sign-ups and upgrades
Implementing Gates
- Set post as partially public
- Configure "Read more" gate
- Set required access level
- Non-qualifying users see upgrade prompt
Best Practices
Permission Strategy
| Community Type | Recommended Setup |
|---|---|
| Free community | Public news, members-only social |
| Paid community | Members-only everything, tier-gated premium |
| Hybrid | Public marketing, paid core content |
Security Tips
- Regularly audit member access
- Remove inactive moderators
- Review tier assignments
- Check for permission creep
Common Mistakes
| Mistake | Solution |
|---|---|
| Everything public | Gate valuable content |
| Too restrictive | Keep some content public for discovery |
| Complex permissions | Keep it simple, use tiers |
Related Guides
Need help? Contact support@uni8.ai